| | Set up and process ACH vendor payments |
| Resolution | Be on Sage BusinessWorks 2026 or newer to process vendor ACH payments. Set up General Ledger accounts Create these accounts in GL, Accounts, Maintain Chart of Accounts: - Holding Account: holds payment funds before bank settlement.
- Fees Expense Account: records ACH processing fees.
- Fees Cash Account: credits ACH processing fees.
Establish an ACH processing account Before processing ACH payments: - Contact a NACHA-compliant bank or credit union.
- Set up an account for ACH payment processing.
- Obtain the account information required to create ACH files.
- Obtain instructions for transmitting ACH files.
Enter company ACH information Use AP, Transfer, ACH Setup Parameters. - Enter setup information that applies to all ACH payments.
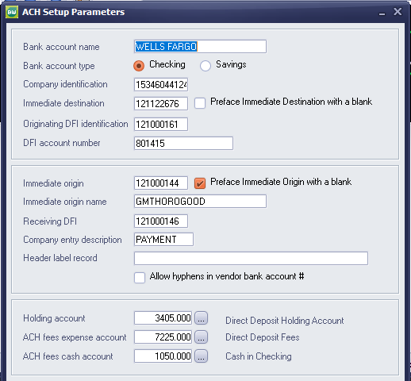 - Verify all field values with your bank.
- Use a financial institution that accepts NACHA-formatted files.
| ACH Setup Parameters | | Check with your bank for assistance with these fields | | Bank account name | Your bank account name. | | Bank account type | Checking or savings account. | | Company identification | Numeric company ID. | | Immediate destination | The nine-digit routing number of the institution receiving the ACH file for processing. Typically, this is your bank’s routing and transit number. | | Preface Immediate Destination with a blank | Select to add a blank preceding the field. | | Originating DFI identification | Routing transit number of the originating Depository Financial Institution (DFI). | | DFI account number | Account number that originates the entries. | | Immediate origin | The nine-digit routing transit number of the institution sending (originating) the ACH file, preceded by a blank. (Often your ODFI will have you insert your company ID in this field.) | | Preface Immediate Origin with a blank | Select to add a blank preceding the field. | | Immediate origin name | The name of the financial institution sending the payment file. | | Receiving DFI | Routing transit number of the receiving Depository Financial Institution (DFI). | | Company entry description | This must be "PAYMENT" for ACH files. | | Header label record | Leave blank unless instructed by the bank. | | Allow hyphens in vendor bank account # | Follow bank instructions. | | Holding account | GL account to hold funds until you send the file to the bank. | | ACH fees expense account | The expense account for fees charged by the bank. | | ACH fees cash account | Cash account used to pay fees. |
Configure vendors for ACH payments
Use AP, Vendors, Maintain Vendors, ACH. - Each vendor can use one ACH bank account.
- Set the account status manually.
- Account status options:
- Send Prenote: creates a prenote.
- Prenote Pending: waits for bank approval.
- Active: enables ACH payments.
- Paper checks continue until you select Enable ACH and Account Status is Active.
 | Maintain Vendors - ACH Payment Dialog | | Enable ACH | Check to enable ACH for this vendor. | | Email Advices | Check to send a Remittance Statement via email to the vendor. This uses the Finance email address to email statements. | | Account Status | Not selected, Send prenote, Prenote Pending, Active. | | Account Type | Checking or Savings. | | Routing Number | Vendor's bank account routing number. | | Account Number | Vendor's bank account number. | Send prenotes - Open AP, Transfer, ACH File Preview.
- Preview the Prenotes Report.
- Verify vendors appear on the report.
- If a vendor is missing, verify that you’ve Enable ACH and Send Prenote checked.
- Open AP, Transfer, Create ACH File.
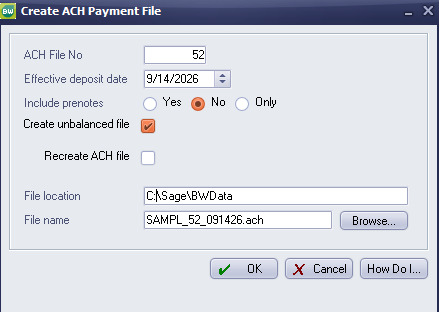 - Select Only in Include Prenotes.
- Verify the date, location, and filename.
- Click OK to create the file.
- Send the file to the bank.
- Change Account Status to Prenote Pending.
- Wait for bank approval.
Select invoices and print ACH payments - After approval, set vendor Account Status to Active.
- Use AP, Checks, Invoice Selection.
- Select invoices through Automatic or Manual Invoice Selection.
- Verify ACH vendors display with an asterisk (*) on the selection report.
- Open AP, Checks, Print Checks.
- Select ACH Payments.
- Enter the starting ACH number the first time.
- Print remittance forms.
- Print the Check Register.
- The Check Register displays the ACH, the ACH number, and Trace No. Pending.
- Sage BusinessWorks replaces Trace No. Pending with the trace number after file creation.
Print ACH File Preview Report - Open AP, Transfer, ACH File Preview.
- Print the ACH File Preview report.
- Verify vendors, ACH numbers, and payment amounts.
Create the ACH payment file - Open AP, Transfer, Create ACH File.
- Review file settings.
- Record the ACH payment number.
- Click OK to create the file.
Verify ACH payments - Open AP, Transfer, ACH Remittance Report.
- Select the ACH Pay File No.
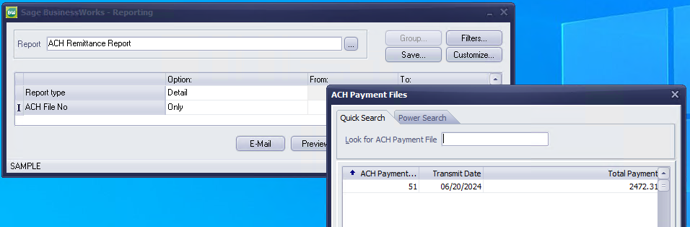 - Preview or print the report.
- Verify vendor information, invoices, payment amounts, and trace numbers.
- If a payment issue occurs, provide the vendor, transmit date, and trace number to your bank.
Post ACH settlement - Open AP, Transfer, Post ACH Settlement.
- Select the ACH payment file number.
- Enter a reference for General Ledger and Cash Management reconciliation.
- Post the settlement.
- Sage BusinessWorks automatically populates the transaction date and payment total.
Print ACH remittance statements - Open AP, Transfer, Print ACH Remittance Statements.
- Select the ACH payment number.
- Print or email remittance statements.
- To email statements, select Email.
- Verify you selected Email Advices for the vendor.
- Enter an email address if the Finance Email field is blank.
- Select Create one PDF file per vendor to generate separate PDFs.
More information - Existing EFT processing remains unchanged. Use AP, Checks, Enter Payments for EFT transactions.
- Void ACH payments in AP, Checks, Void Payments by Vendor.
- Vendor Inquiry displays ACH payments and trace numbers.
- Reports such as the Check Register and Check Detail Report display ACH payments and trace numbers.
|
|